The Arduino Uno is the perfect starting point for beginners in electronics and programming. It provides a simple, affordable, and open-source platform to learn coding, hardware interfacing, and IoT. With huge community support and countless tutorials, it’s the best way to start your journey in embedded systems.

“Arduino Uno makes electronics fun, interactive, and easy to learn — perfect for beginners and future innovators.”
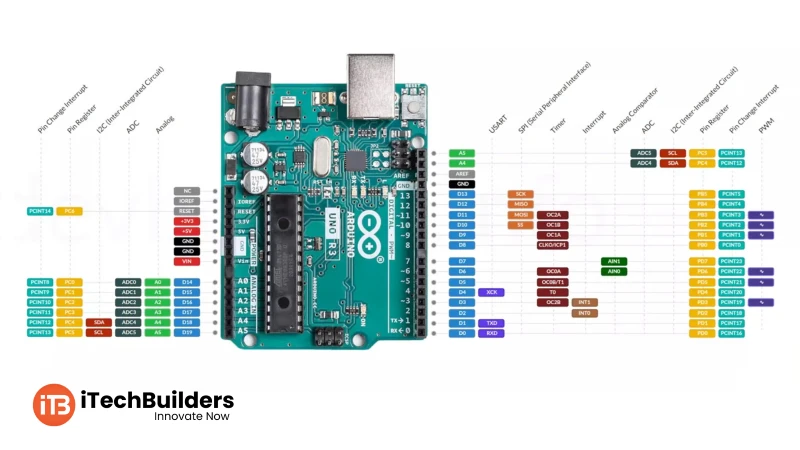
The Arduino Uno pinout lets beginners easily connect LEDs, sensors, motors, and modules. With labeled pins, it’s straightforward to understand and use.
The famous Blink LED is the easiest way to start with Arduino Uno. It turns an LED ON for one second and OFF for one second repeatedly.
 // Blink LED Example
int ledPin = 13;   // LED connected to pin 13

void setup() {
  pinMode(ledPin, OUTPUT); // Set pin as OUTPUT
}

void loop() {
  digitalWrite(ledPin, HIGH); // Turn LED ON
  delay(1000);                // Wait 1 sec
  digitalWrite(ledPin, LOW);  // Turn LED OFF
  delay(1000);                // Wait 1 sec
}
After Blink, beginners can explore sensor projects (LDR, temperature, motion), motor control (PWM), and IoT projects with Wi-Fi modules. This foundation builds skills for robotics, smart devices, and IoT careers.
iTechBuilders offers beginner-friendly Arduino kits, step-by-step tutorials, and expert mentorship for students, schools, and hobbyists. Whether you are just starting or want to build IoT projects, we provide DIY kits, training workshops, and project support. Contact us to begin your Arduino learning journey today!

Comments
0